As mentioned in an earlier post, I had been planning on finding a DIY mobile project for the babies room. What I never mentioned was that I never actually pictured it to be "mobile". I wanted something visually stimulating for babe to stare up at, not something cutesy wootsy that sings.
After finding myself addicted to Pinterest, thanks to an invite I received from a few fabulous ladies, I realized I could find something fun on there, and that I did. Pom-poms! Not only are they fun, cheerful, & visually stimulating, it cost me a total of $6 and about 1.5 hours to create.
Here's a tutorial on how to create them from Martha Stewart Weddings.
Living life in the Canadian Rockies with my wonderful hubby Joshua, sweet baby girl Alexis, Puggle Petey and kitty Saber. Graphic Design guru who loves to bake, take advantage of the world outside, eat amazing food & spend my time with my family. Living with Crohns Disease and trying to make the most out of life.
Showing posts with label Baby. Show all posts
Sunday, 17 July 2011
Wednesday, 13 July 2011
Easywalker QTRO
Months, and months ago we ordered our stroller online, off of Hautelook, for an amazing steal of deal (seriously amazing, about 1/3 of the regular cost), the only downside was we had to ship it to the US. We've been slowly receiving the pieces from family, and each time is just so exciting. Today, the final pieces arrived, and now, finally, it was time to play and figure out this thing.
At first glance I was overwhelmed. So many pieces to sort thru, thank goodness for instruction books. This stroller is three strollers in one. There is an attachment that allows you to use your car seat with it (any car seat at all, we have a Baby Trend car seat, and it fits snug as a bug), it has a basinet you can put in, or you can just have the regular three position sit/lay. I have to say, as overwhelming all the pieces are, it's actually really easy to figure out and slap together.
Ordering this stroller was a bit stressful. We really wanted a Chariot, but there was so much a chariot couldn't help with for the first year of babies life, and when it came down to it, we decided we really wanted those features. A Chariot will be in our future, but likely not until next summer, for biking season (hello Kijiji). All in all, I'm extremely happy with our choice and our purchase, and I can't wait to use it, literally, if you want to lend me your baby to push around in my stroller, I'd be ecstatic.
(I apologize in advance for the crappy photos. I was to lazy to A) bring the pieces to our backyard for nice green bright photos; B) Go up two flights of stairs to get a better camera than my iPhone to take photos with; C) Brighten them up in Photoshop).
At first glance I was overwhelmed. So many pieces to sort thru, thank goodness for instruction books. This stroller is three strollers in one. There is an attachment that allows you to use your car seat with it (any car seat at all, we have a Baby Trend car seat, and it fits snug as a bug), it has a basinet you can put in, or you can just have the regular three position sit/lay. I have to say, as overwhelming all the pieces are, it's actually really easy to figure out and slap together.
Ordering this stroller was a bit stressful. We really wanted a Chariot, but there was so much a chariot couldn't help with for the first year of babies life, and when it came down to it, we decided we really wanted those features. A Chariot will be in our future, but likely not until next summer, for biking season (hello Kijiji). All in all, I'm extremely happy with our choice and our purchase, and I can't wait to use it, literally, if you want to lend me your baby to push around in my stroller, I'd be ecstatic.
(I apologize in advance for the crappy photos. I was to lazy to A) bring the pieces to our backyard for nice green bright photos; B) Go up two flights of stairs to get a better camera than my iPhone to take photos with; C) Brighten them up in Photoshop).
Easywalker QTRO in the regular 3 stage sit/lay (standard) form.
Has a built in sun canopy extender. Aslo, in the box came a mosquito net and rain cover. The foot rest is adjustable, and the push bar is adjustable.
Peek a boo.
Shocks and large air tires, just what the Rockies needs. Perfect for our Mountain town.
Easywalker QTRO with the added bassinet. Took about 5 seconds to instal. The bassinet is super cozy, and has legs. We'll be using this alot, while traveling for her to sleep in, or if we choose to have our little lady in our room with us.
Bassinet also comes with a mosquito net and rain cover.
Car seat! This is the Easywalker with the any car seat adapter. Took about 5 seconds to instal the attachment, and about 2 to fit the car seat in snuggly.
Folds down in about 2 seconds, and is nice and compact. It can fold down in each stage, as long as you take the car seat and bassinet off (duh), for easy travel.
It's hard to imagine that in just 12 or so weeks we'll be pushing a little lady around in this.
Monday, 4 July 2011
Nursery (for the most part) done.
A couple weeks ago I said I would post more pics after the long weekend, when we would finish the nursery, well, here I am! I'll admit, the nursery isn't DONE done, but, it's mostly done. We're still waiting to find a bedding set that is perfect for out little girl, and I'm trying to find a DIY mobile project to start on, and then of course, we have to wait (an estimated) 93 (but who's counting) days until our little miss arrives and completes it. Never-the-less, here we are, the perfect sanctuary for our little girl to grow up in.
I have a few DIY projects in mind for the mobile, here's hoping you see one of them sooner than later. All I need to do is find a spare afternoon, or to browse Etsy and find something that will arrive in my mailbox. Can one consider Etsy the cheaters way to DIY?
Monday, 6 June 2011
Baby Shower Cupcakes
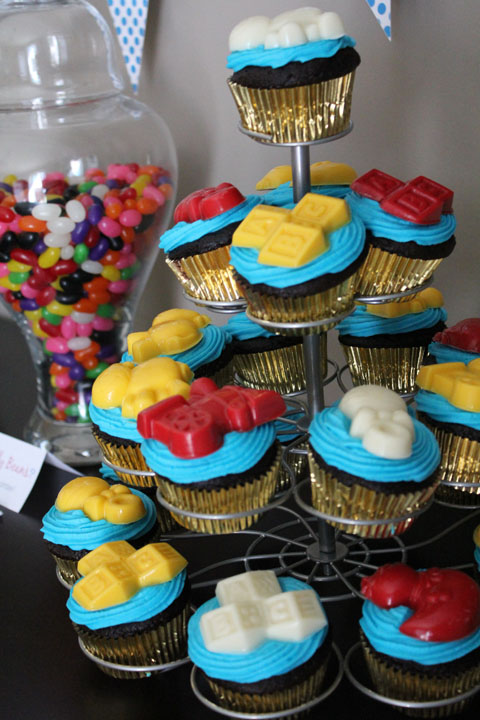
This weekend I hosted, along with June, Chloe & Lindsay our friend Jordy's baby shower in my backyard. It was the perfect day to have to have a backyard baby shower brunch. I made some adorable (and oh so yummy) cupcakes that I just had to share.
BABY SHOWER CUPCAKE TOPPERS
What you need:
Candy Melts (you can find these at any store that sells baking supplies, Michaels has them)
Candy Mold Tray
Piping bag (disposable)
• Put the candy melts in a bowl and melt in the microwave 30sec at a time, stirring each time
• When they are all melted and smooth, scoop/pour the melted candy melts into the piping bag
• Cut the tip off the pipping bag
• Pipe the candy melts into the mold, being careful not to overflow
• HINT - If you only have one mold, only melt enough candy melts to fill the mold once
• Let the tray cool completely, cooling these in the fridge will not ruin them. Removed once cooled, and continue on with more if you need.
These are great, as you can do them ahead of time and just keep them in the fridge until you need them.
Make your favourite cupcakes, icing too. When they are done, place these fun shapes on top, and voila! Cute & yummy themed cupcakes.
BABY SHOWER CUPCAKE TOPPERS
What you need:
Candy Melts (you can find these at any store that sells baking supplies, Michaels has them)
Candy Mold Tray
Piping bag (disposable)
• Put the candy melts in a bowl and melt in the microwave 30sec at a time, stirring each time
• When they are all melted and smooth, scoop/pour the melted candy melts into the piping bag
• Cut the tip off the pipping bag
• Pipe the candy melts into the mold, being careful not to overflow
• HINT - If you only have one mold, only melt enough candy melts to fill the mold once
• Let the tray cool completely, cooling these in the fridge will not ruin them. Removed once cooled, and continue on with more if you need.
These are great, as you can do them ahead of time and just keep them in the fridge until you need them.
Make your favourite cupcakes, icing too. When they are done, place these fun shapes on top, and voila! Cute & yummy themed cupcakes.
Subscribe to:
Posts (Atom)